
The Acatenango volcano hike is one of the most unique experiences in Central America, and one that should not be missed on your Guatemala itinerary.
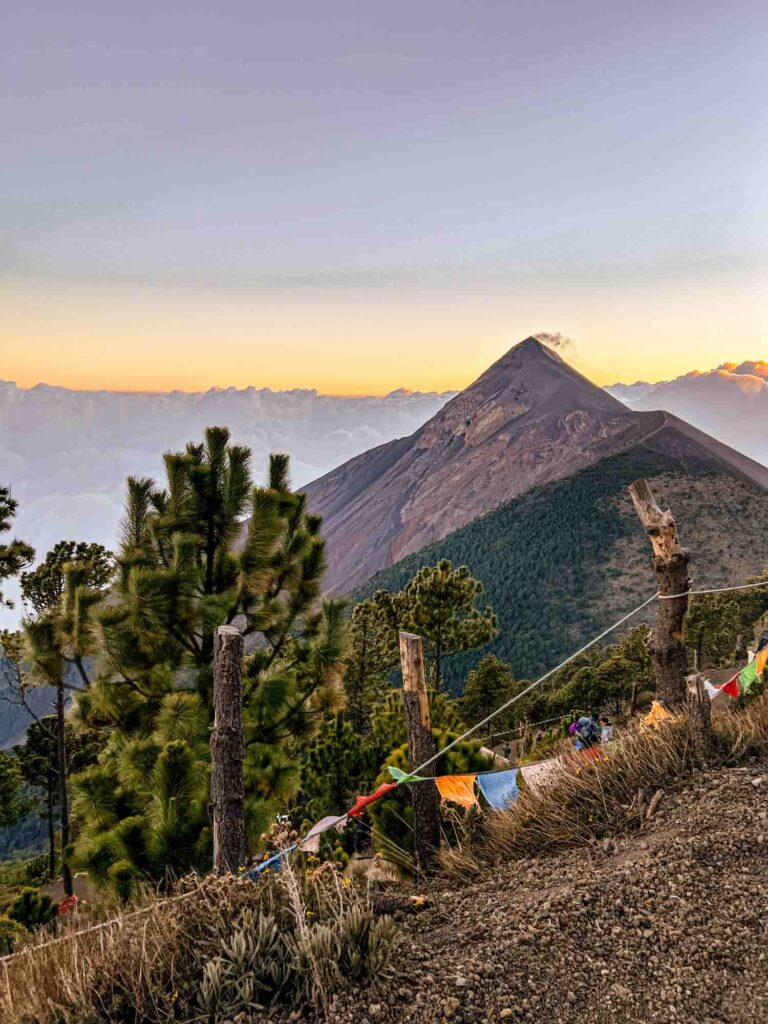
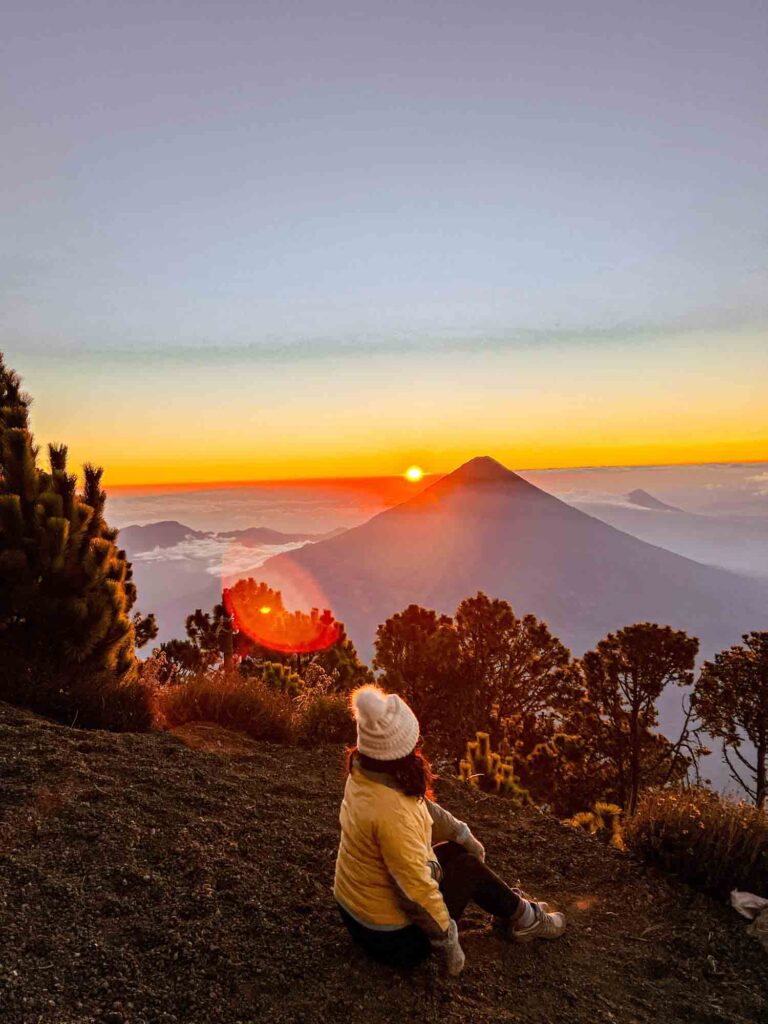
In this famous Guatemala volcano hike, you will climb up to the top of Volcan Acatenango, which towers over 13,000 feet above Antigua. From the top of Acatenango, you get the thrilling experience of getting an up close view of Volcan Fuego, the most active volcano in Central America.
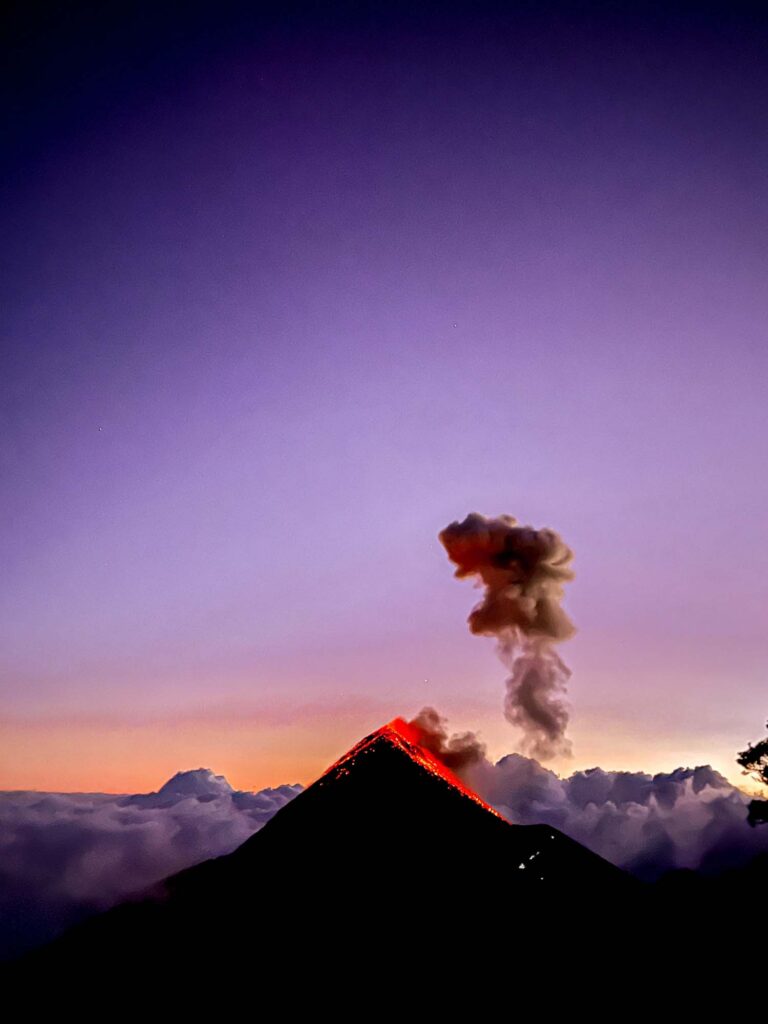
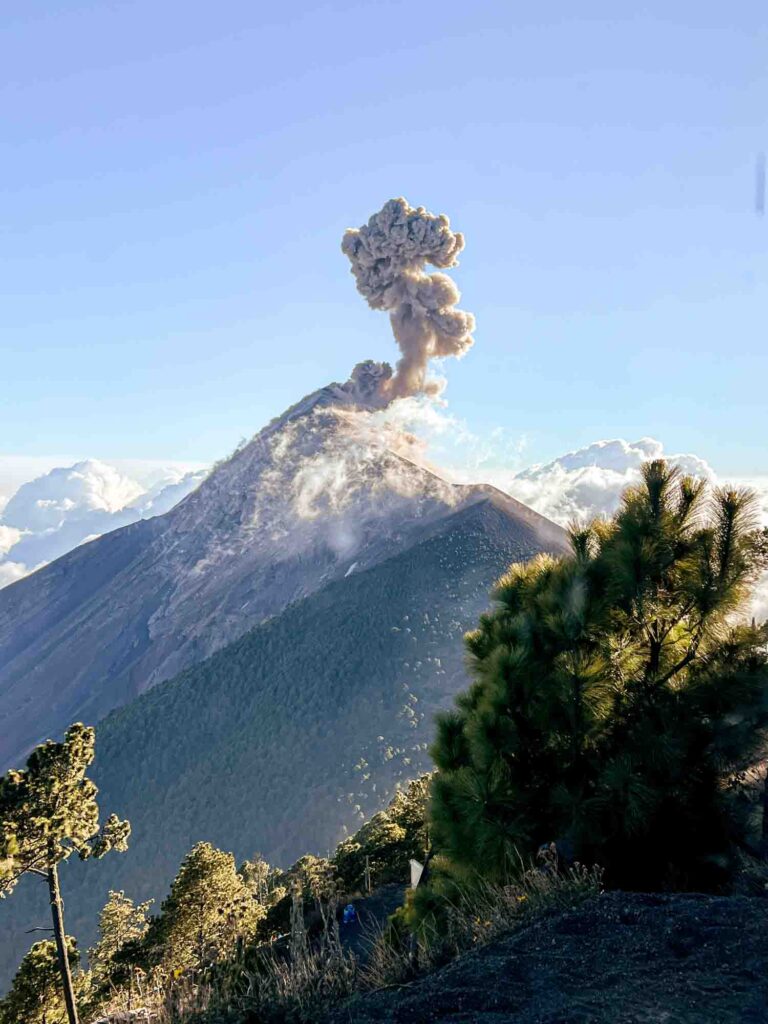
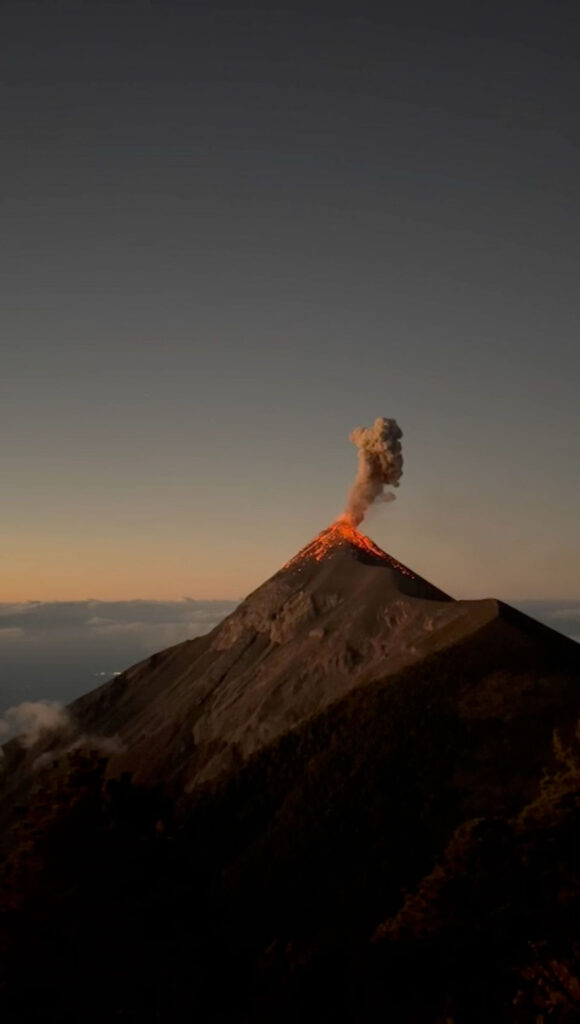
When they say that Fuego is active, they aren’t kidding – it erupts at a very regular frequency, I’m talking every 20 minutes or so. Every time it goes off, you’ll feel and hear its thunderous explosions, and watch it spew out sparks of orange lava, and send giant puffs of smoke in the air. It is an experience like no other, and you’ll get the best seat in the house to see the show.
Yes, the Acatenango volcano trek is definitely hard – I questioned exactly WTF I was doing with my life the entire way up and was sore for days afterwards. But once you get up to the top and get your first glimpse of Fuego doing its thing, well, it will all have been worth it.
Seriously, the Volcan Acatenango hike is one of my all-time favorite travel experiences to date, and one that should not be missed. If you are considering a Guatemala volcano hike, then you can do no wrong with Acatenango.
However, doing the Acatenango volcano hike requires a bit of preparation. You may also have lots of questions about the experience and what exactly it entails – I know I certainly did! Well, keep on reading because I’ll go over everything you need to know about the Acatenango trek!
This post contains affiliate links. This means that if you make a purchase or booking, I may receive a small commission at no additional cost to you. This helps me keep providing you with helpful content for free. Pictures & Words is a participant in the Amazon Services LLC Associates Program, an affiliate advertising program designed to provide a means for us to earn fees by linking to amazon.com and affiliated sites at no cost to you.
Things to know about the Acatenango Volcano Hike

Acatenango Volcano Hike at a Glance
Distance: 8.5 mi
Elevation Gain: 5,308 ft (1618 meters)
Difficulty: Hard
Type: Out and back
Elevation at base camp: 11,811 feet (3600 meters)
Elevation at summit: 13,044 feet (3,976 meters)
Park entrance fee: 110Q
Why should you do the Volcan Acatenango Hike?
The Acatenango volcano hike is one of the most thrilling experiences in Guatemala, allowing you to climb up Central America’s third highest volcano, in order to get up close to Volcan Fuego, the most active volcano in the region.
Along the way, you’ll hike through four distinct ecosystems, passing through farmland, a subtropical rainforest, and a high alpine forest, before arriving in volcanic terrain.
While you can see Fuego go off in the distance from many places in Antigua, getting an up close and personal view of it was a once-in-a-lifetime experience. Seeing Fuego spew out sparks of lava and feeling the thunderous power of its explosions was such a unique experience that ended up being one of the ultimate highlights of my time in Guatemala.
It is one a famous Guatemala volcano hike for a reason!
Volcan Acatenango vs. Volcan Fuego
Standing over 13,000 feet high above Antigua, Volcan Acatenango is the third highest volcano in Central America. It is a stratovolcano – a conical volcano made up of many layers of hardened lava, tephra, and volcanic ash.
It is considered to be a dormant volcano, as its last eruption was in 1972.
Acatenango is actually made up of two peaks – Pico Mayor (the highest peak), and Yepocapa. Sitting parallel to Acatenango (and actually attached at its base) is the explosive Volcan Fuego, one of the most famous volcanoes in Guatemala.
It is Volcan Fuego that is the main attraction here, as it is the most active volcano in Central America. The name “Volcan Fuego” translates into the “Volcano of Fire,” which is an appropriate name – Fuego puts on a powerful display of lava and smoke every time it goes off, and it is absolutely a sight to behold.
This is what makes this one of the most famous Guatemala volcano hikes – it truly a spectacular sight, and a highlight for many. It is absolutely worth the tough climb!
Best time to hike Acatenango
The best time to hike Acatanengo is during Guatemala’s dry season, which runs from November to April. This is when you’ll find the clearest and driest days, especially in January and February, meaning that you’ll also find the best views.
I personally did the Acatenango trek at the end of February and found this to be true – the views were spectacular! While we did experience some fog and clouds at some points in the hike, the conditions at the top were perfect.
However, do note that these months tend to also be the coldest, especially at night – the lows were hovering around freezing when we were at camp, and can even get into the single digits Fahrenheit. Be sure to pack plenty of warm layers!
The rainy season in Guatemala runs from May to October. This usually means clear mornings which turn overcast by midday, followed by an hour or two of rain in the afternoon, with clear evenings. However, keep in mind that there are also times when there’s too much cloud cover to see Fuego, and also when tours get canceled altogether because of poor conditions.
A friend of mine did the Acatenango hike in late May, and while it did pour for a few hours (and looked kinda miserable), it did clear up by evening and she was still able to capture incredible footage of Fuego going off. She said it was still completely worth it!
However, there are two advantages to hiking Acatenango in the rainy season:1) the temperatures tend to be a bit higher; and 2) it tends to be a bit less crowded, which means you can book your tour more spontaneously.
Choosing a tour company
There are tons of tour companies offering Acatenango treks in Antigua – you’ll find plenty of signs advertising them as you walk through town. You can also book a tour through many hotels and hostels.
However, the quality of the tour companies varies greatly, so I suggest doing a bit of research to find the best option to suit your preferences.
Some factors to consider when selecting a tour company:
- Budget: You can find a range of tour options to suit your budget. However, be careful with the cheaper tours, as some may not include enough food, equipment, etc.
- Sleeping arrangements: Some tours squish you into communal tents, others offer private A-frame cabins, and there’s others somewhere in between.
- Food: What meals does the tour include? Be sure the tour you choose includes enough food to fuel you through the hike – or bring your own to supplement.
- Equipment: Are gear rentals included in your tour price? Or, can you rent them at an additional cost?
- Group size: Do you want to go in a large, medium, or small group? Or a private tour?
- Guides: How many guides per group?
- Read the reviews: This will tell you everything you need to know, and whether a tour is right for you.
Best companies for the Acatenango Volcano hike
Wicho & Charlie’s
I did my Acatenango Volcano hike with Wicho & Charlie’s and I wholeheartedly recommend them! I have since recommended them to a few friends who hiked Acatenango after me and they all loved their experience as well!
The biggest selling point for me in going with them was that they are the only company with A-Frame cabins built directly on the mountain. This is WAY more comfortable than sleeping in a tent, plus it protects you from the elements much better! You can choose from a shared cabin with 12 people, 6 people, or a private cabin for 2.
The Wicho & Charlie’s guides are paid a comfortable living wage, as well as donating $3 from every review on TripAdvisor and Google to support the communities that they’re from. It shows that the guides are happy here – the guides on our tour were AMAZING – super encouraging and helpful, and they made sure you were taken care of (and that you actually made it to the top in one piece!).
They ensure that you are geared up and prepared for the hike, and provide many complimentary rentals, such as winter jackets, headlamps, hats, scarves, gloves, and water bottles. You can also rent backpacks, base layers, trekking poles, and merino socks at an additional cost.
The food on our hike was all filling, delicious, and nourishing (and happened to be all vegan), and was the perfect fuel for the difficult hike. We had vegan meatballs and mashed potatoes for lunch, a lentil curry for dinner, and a burrito for breakfast.
I also loved that Wicho & Charlie’s supports many causes to give back to the local Guatemalan community, as well as environmental initiatives.
OX Expeditions
When I was researching Acatenango tour companies, OX Expeditions was another one that was very highly rated. OX has been around since 2004 and is consistently rated as one of the top expedition companies in the country – aside from Guatemala volcano hikes, they offer cycling and surfing tours as well.
A friend of mine did her Acatenango trek with OX, and she highly recommended them! While you do sleep in tents with OX, she said that they were super comfortable and that all necessary equipment was provided. She said that the food was good and filling as well!
OX also supports a number of environmental and community initiatives.
How much does it cost to hike Acatenango?
This varies widely based on which tour company you choose – I’ve seen as low as $30 USD, and $250 for a private A-frame cabin for two.
The tour I chose – in a shared A-frame cabin from Wicho & Charlie’s – is currently priced at $97 USD.
Also keep in mind that there is a 110Q park entrance fee that is not usually included in the tour price – bring cash to pay this at the park entrance!
How long is the Acatenango trek?
The Acatenango hike is 8.5 miles round trip.
Going up takes about 4-5 hours (it took me closer to 5), and coming down took around 2 hours.
While you can technically complete it in one day, it is recommended to do an Acatenango overnight hike. This is because you get to see Fuego go off at night, which is the best part of the experience!
Altitude
The Acatenango summit stands at 13,044 feet above sea level; base camp is at 11,811 feet.
I recommend spending a few days in Antigua to get acclimated to the altitude – although Antigua only stands at 5,069 feet in elevation, so you’re going to be quite a bit higher when hiking Acatenango.
Altitude affects everyone differently, but for me, it made the hike even more difficult than it already was. You start feeling it more and more as you go up the mountain.
Spending the night at base camp also was uncomfortable for me, although I didn’t experience any sickness (a few people in our group did). It was a miserable experience trying to sleep because breathing felt so difficult (and it was COLD).
Definitely consider taking meds if you are sensitive to altitude. Also remember to stay hydrated – bring plenty of water up with you!
How hard is the Acatenango hike, like really?
Not going to lie – it is HARD.
It’s one of the most difficult physical challenges that I’ve completed in my life (coming from someone who ran a full marathon, and regularly runs half marathons). The hike is pretty much straight uphill for almost five miles – it is a steep and relentless climb. Combined with the altitude, it is for sure challenging.
However, I believe that anyone who is reasonably fit can complete the hike!
I originally had reservations about doing the Acatenango hike because I was worried that it would be too hard. But my friend convinced me that I was more than capable, and while I struggled, I survived and was so glad I did it!

What to pack for the Acatenango overnight hike
The Acatenango trek is not your average hike, so it’s important to pack all the necessary items so that you are appropriately prepared! You’ll encounter uneven terrain, high altitude, and cold temperatures throughout the trek.
Make sure that you have everything you need to handle it all – not being prepared can lead to injury and even death.
Here are some of the things I recommend you bring on the Acatenango overnight hike:
What to wear when hiking Acatenango
It is important to wear layers – while the beginning of the hike tends to be warm, it gets colder the higher you go up the mountain. I hiked in shorts and a tank top, which was fine for most of the hike, but I definitely got cold towards the end. I immediately changed into my warm clothes as soon as I got up to base camp.
Keep in mind that it gets FREEZING cold (like, literally freezing) at night. You NEED to be prepared! It is also very chilly early in the morning, whether you’re hiking to the summit or just watching the sunrise at base camp. Pack warm layers to be prepared!
Some items to pack:
- Puffy jacket: I rented one from my tour company, but I wish I had my Patagonia Nano Puff jacket (men / women) when I did the hike, as it is super warm, insulated, lightweight, and easy to pack. The Uniqlo Ultra Light Down Parka (men / women) is also a great option if you’re looking for something more affordable.
- Fleece: I took my Columbia fleece zip up (men / women) and it was perfect.
- Base layers: I love my Uniqlo Heattech shirts (men / women) – they’re lightweight, moisture wicking, and adapt to your body heat.
- Thermal underwear/tights: I like the Uniqlo Heattech tights (men / women) under my pants for extra warmth
- Fleece Lined Leggings: These are my favorite pairs – they come in a bunch of colors (and you can even choose ones with pockets), and are super warm and comfortable!!
- Wool socks: I packed these and never once did my feet get cold.
- Beanie / Scarf / Warm gloves
- Sunglasses: Parts of the hike can get bright – I love my polarized Goodr sunglasses.
- Hiking boots: You want shoes with good grip and ankle support! My new go-to is the Columbia Newton Ridge shoe (men / women)- comfortable, sturdy, and affordable!
- Waterproof layer + backpack cover: Especially important during rainy season
Do I *really* need to pack all this stuff?
I know, I know – you’re probably packing for warm weather in Guatemala, so you’re wondering if you really need to pack all this cold weather gear.
You don’t necessarily have to pack all of the above – many tour companies offer gear rentals – some items for free, and some at a nominal cost. However, keep in mind that you’ll essentially be choosing from hand me downs so they might not have your size or preferences.
I recommend at least bringing at least a few things of your own, and renting the rest. I brought my own hiking shoes, base layers, fleece, pants, socks, beanie, and scarf. I ended up renting a jacket (but wish I had my own because I ended up with one that was a bit too small) and gloves, along with a few other things like trekking poles.
Other things to pack for hiking Acatenango
- Backpack: You can usually rent one from the trekking company, but it might be better to bring one of these travel backpacks so you’re comfortable with your own gear. I just used the backpack I brought along as a carryon, but I wish I had an actual hiking backpack. They recommend 30L (and that’s what they rent out), but I think you can get away with something a bit smaller.
- Trekking poles/walking stick: These are usually offered for rentals at a nominal cost, and they SAVED me – I could not have done the hike without then, as volcanic sand is VERY slippery! If you don’t get trekking poles, there are usually people near the trailhead selling sticks for a few quetzales as well.
- Headlamp: You’ll basically be in complete darkness at night, and if you are doing the sunrise hike to the summit.
- Water: Bring PLENTY of water – they suggest at least 4L (with a liter going to cook your food). Our tour company provided water bottles to take up, but it might be easier to just take a hydration pack or bladder.
- Electrolytes: For extra hydration – I swear by Liquid IV (which I wish I discovered before doing the hike), which I’ve found also helps with recovery!!
- Battery pack: There’s not really any reception, but you’ll probably take tonssss of photos and videos! The cold drains your battery faster, so carry a charger to keep your phone juiced.
- Wipes: Helpful for wiping off all the sweat off your face/body, since you won’t be showering.
- Extra snacks
- Sunscreen: The sun is stronger at higher elevations
- Toilet paper: You’ll need to carry your own (although our tour company gave us some at the office so you don’t need to bring an entire roll)
- Garbage bag: You MUST pack out all your garbage!
- Cash: For the park entrance fee and tipping your guides
Other FAQs
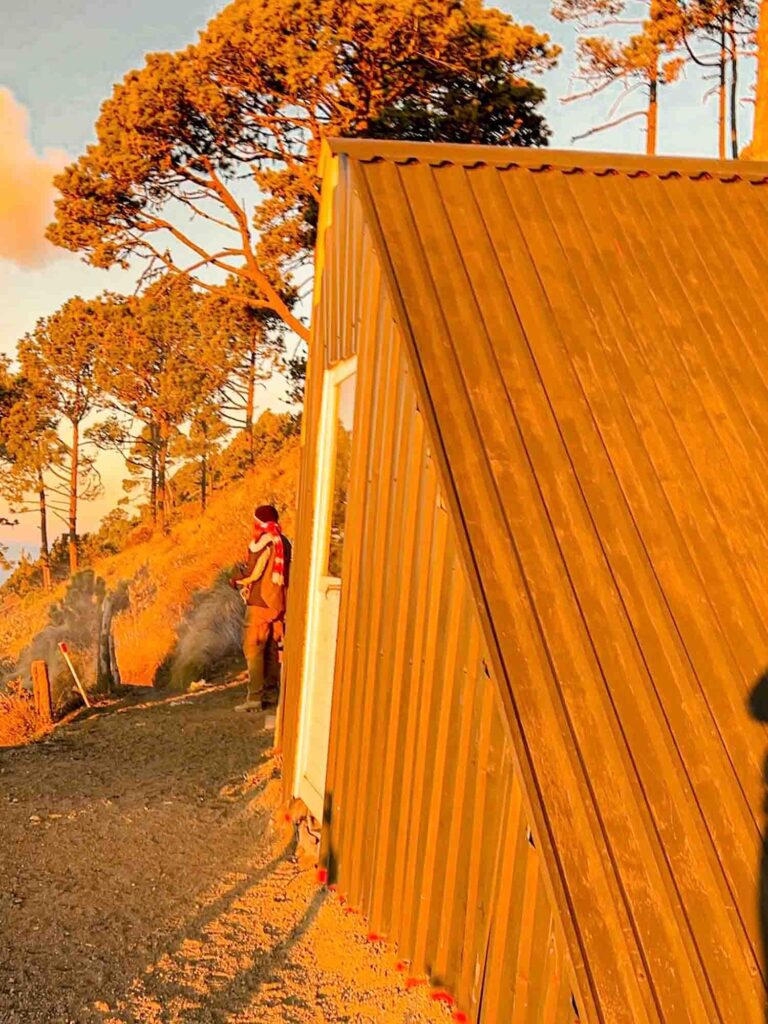
- Where do you sleep on the Acatenango trek? You sleep on the mountain at base camp. Most companies provide tents. However, I went specifically with Wicho & Charlie’s because they have A-Frames that they have built on the mountain and found this to be much more comfortable than sleeping in a tent.
- Are there bathrooms? No – you’ll have to go out in nature! Also keep in mind that if you have to go #2, you need to dig a hole.
- Is it safe to hike Acatenango? Generally yes. Fuego is located about 3 kilometers away from Acatenango, so you are theoretically at a safe distance from it. However, volcanoes are unpredictable so you never know. There was a massive eruption in 2018 that killed at least 69 people, although most of the fatalities were residents of the villages located on the base of the mountain. While the chance of this happening is rare, it is important to know all the risks involved (and get travel insurance!).
- Can you hire a porter? Yes – I did and was really glad I did! It was very affordable, and my porter stayed with me the entire hike, even when I was falling behind.
- Are tips included? Tips are not included in your tour price. Bring cash to tip your guides (I tipped about 20%). The guides work hard (I mean, can you imagine having to go up and down that mountain so many times?) and don’t make much, so be sure to compensate them for it!


- Food on the Acatenango hike: The food provided on the Acatenango trek varies greatly by tour company. I’ve seen meals provided include everything from protein bars, instant noodles, and sandwiches. Be sure to check that the meals provided are going to be filling enough to fuel you on the hike! Do realize that you’re going need a lot of energy (and calories) on the hike, so make sure that you’re going to be eating appropritatel. Our tour with Wicho & Charlie’s provided vegan meatballs and mashed potatoes for lunch, a lentil curry and rice for dinner, and a breakfast burrito in the morning. They also let us fill up our own bag of trail mix to have as a snack. I felt like they provided an ample amount of food and it felt filling and nourishing – I also carried some protein bars with me, but never ate them.
- Can you hike to Fuego? Depends on the tour company, but many also include an option to hike to the base of Fuego for an additional cost, if conditions permit (Wicho & Charlie’s did). However, I hear it is quite difficult – the people in our group who did it complained of very slippery sand and very strong winds.
- Can you hike Acatenango in one day? While you can technically hike Acatenango as a day hike, I highly recommend that you do an Acatenango volcano overnight hike instead. This is because you get to see Fuego go off at night, and see the sparks of lava fly off the volcano – it’s truly a spectacular sight and what made the experience so special!
- Can you hike Acatenango on your own? Technically yes – but it is not recommended due to the dangers on the trail, the cold temperatures, and potential for altitude sickness. People have died doing the hike because they were unprepared. Tours are pretty affordable, so I highly recommend going with a guide – but if you don’t, make sure you are properly prepared and experienced.
- Where can you store your luggage while on the hike? Many tour companies will let you store your luggage in their office while doing the Acatenango overnight hike.
What to expect on the Acatenango Volcano overnight hike
Acatenango Overnight Hike Day 1

Arriving at the tour office
Our call time was at 7am, and we arrived at the Wicho & Charlie’s office, excited but nervous at what to expect.
Upon arrival at the office, we got a chance to pick out our gear rentals, enjoy some breakfast (which included light items such as bread, fruit, protein bars, and juice), meet the other people in our group, and get a brief orientation of what to expect on the trek, safety guidelines, etc.
Then around 9am, we got into shuttles and set off to the trailhead.
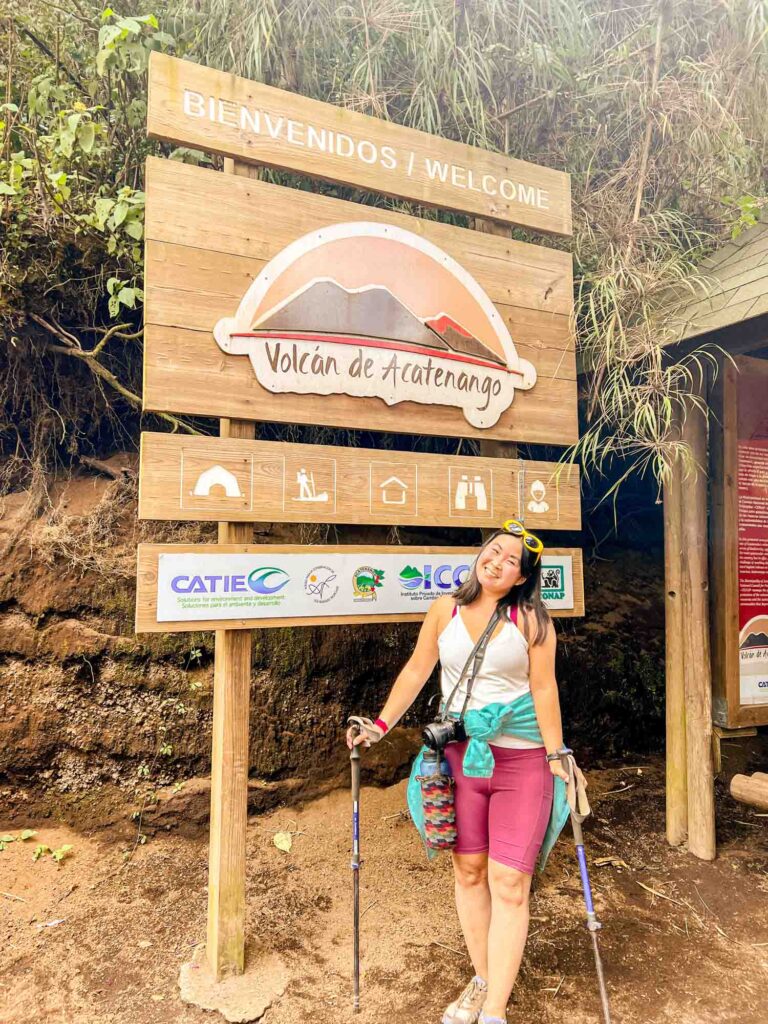
Where is the trailhead?
The trailhead is located in La Soledad, about an hour outside of Antigua. We arrived just before 10am, ready to tackle the hike.
If you need last minute supplies, this is your chance – there are a few stands selling everything from walking sticks, socks, water, and snacks, run by local families.

Part 1: Starting the Volcan Acatenango hike
After the entire group arrived at the trailhead, it was time to finally start hiking Acatenango!
The first part of the hike takes you through farmland, and you’ll pass corn fields along the way.
It starts off with a steep uphill climb that stays an uphill climb throughout. Most of this first part requires walking through sandy trails, which makes the ascent even tougher – I almost started to regret signing up for the hike, but kept pushing through. The trekking poles definitely will help at this point!
The guides gave us plenty of breaks through this first part – almost everyone finds this part hard!
We passed along a few more vendors selling supplies and snacks (I picked up some PowerAde and was glad for the extra electrolytes!), and then we reached the park entrance, where we paid the 110Q entrance fee.


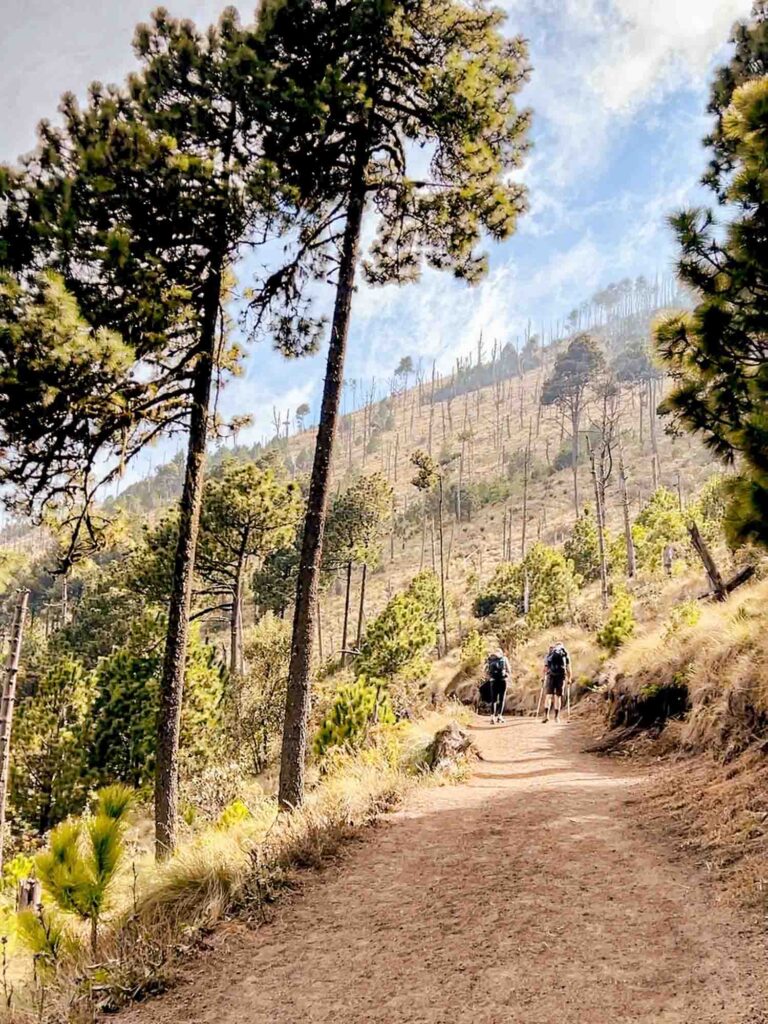
Part 2: A steady climb through the rainforest
Upon officially entering the park, the landscape changes dramatically and you’ll enter a cloud forest, filled with moss-covered trees. The climate also changes here – while the first part of the hike was in almost full sun, you’ll encounter plenty of shade and cool, damp air.
This part of the hike is theoretically easier because you’ll be walking on solid ground and not sand, but I still found it relentlessly steep and difficult. You’ll be going up quite a bit in elevation as well. I was one of the slowest in the group here, but luckily my porter stayed with me the entire time (and I was so glad I had him!).
The first two sections are the most difficult when hiking Acatenango – things get a bit easier after this section (well, sort of).
After finishing this section, we stopped for a (well-deserved) lunch break and got to relax for a bit before continuing on to the rest of the Acatenango hike.


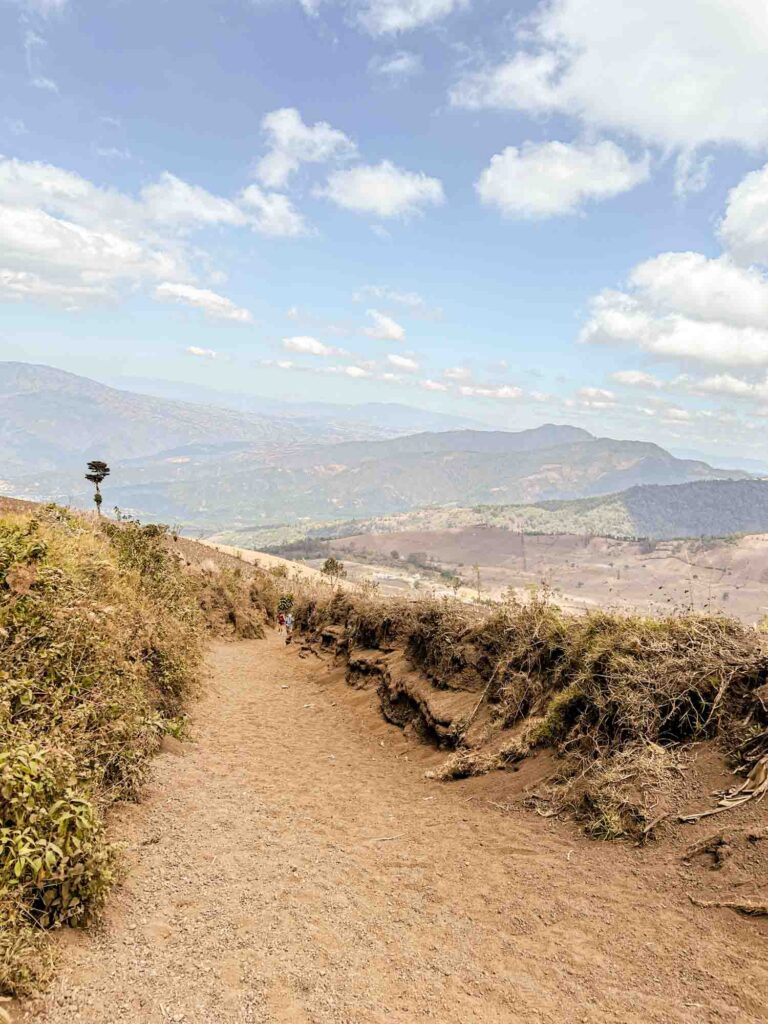
Part 3: The “Guatemalan Downhill”
The next part of the hike is what our guides referred to as a “Guatemalan downhill” – it’s a mix of downhill and flat sections, with uphill parts mixed in. While it will feel like a relief when you do those downhills, those uphill sections remind you that even this section ain’t easy.
The landscape changes again in this section, and you’ll find yourself in an alpine forest, with tall pine trees and dry ground. The clouds also started rolling in at this point; and then all of a sudden, you’ll find yourself standing above them, which was super cool.
This is when I started to feel the altitude – my chest felt tight and my breathing got (even more) heavier, which made me realize how high up I was.
Part 4: That last bit to Base Camp
After the “Guatemalan Downhill,” there’s only one section that remains before you get to base camp! This section is relatively short, but I found it to be the most challenging part.
Once again, you’ll find yourself in a new environment, this time in volcanic territory. As a result, you will have to contend with slippery volcanic sand, which is no joke. For every step I took, I slid back at least two. It felt like I was literally going backwards, and I worried if I was ever going to make it to base camp since it felt like such a struggle.
Your trekking poles or walking stick will be a lifesaver during this part – I don’t know how I could’ve hiked through this section without them!
After questioning whether I was ever going to make it, I started seeing signs pointing to the Wicho & Charlie’s base camp and – FINALLY – I made it!
Arriving at Base Camp
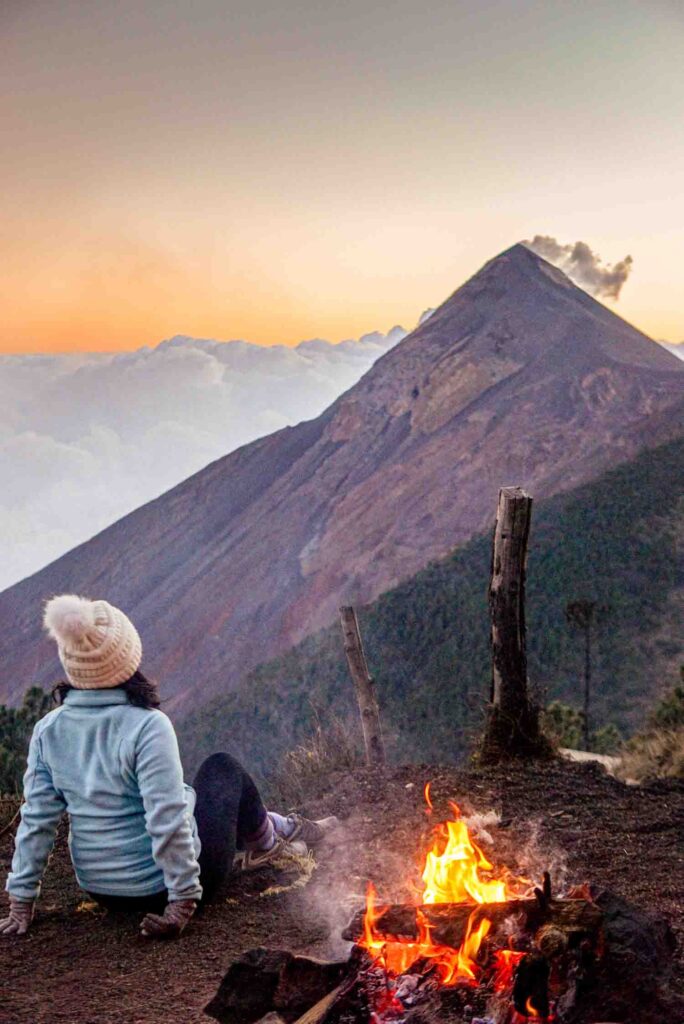
Upon arriving at base camp and catching my first glimpse of Fuego puffing out smoke, all the struggle was forgotten and I was amazed. It is truly a sight to behold.
I was so wiped upon arriving at base camp that the first thing I did was get into my cabin and take a nap. It didn’t take long for me to jump out of bed screaming and I was startled awake by loud, explosive noise and a violent rattling of our A-Frame cabin.
It took me a bit to realize that the noise was coming from Fuego erupting! It took me by surprise exactly how powerful the eruptions were – it sounded like thunder, and the vibrations almost felt like an earthquake.
Needless to say, I didn’t get much sleep that night, either.
At this point, the conditions were good, so those who wanted to had the option of either hiking to the summit for sunset, or to Fuego. I was still feeling wiped, so I just hung out at base camp. My friends decided to go to the summit, though!
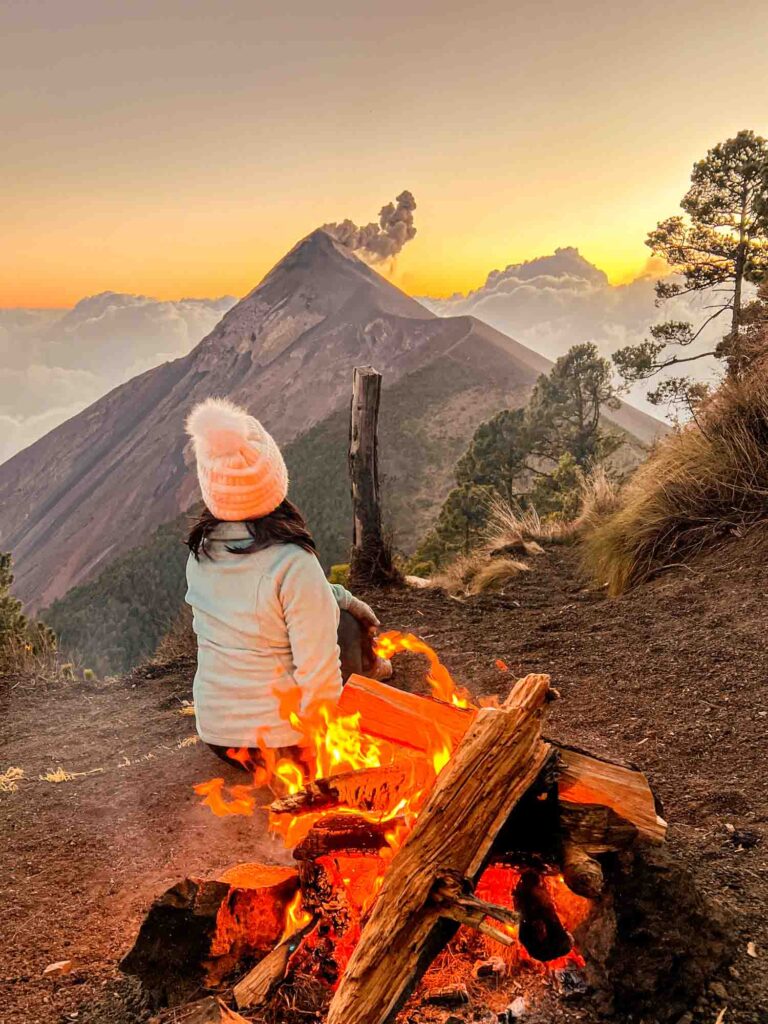
The guides were setting up the fire at this point, so I just relaxed and tried to warm up with the fire, and got to know some of the people in our group. One of the highlights of this whole experience was meeting people – I made several new friends that I still keep in touch with!
As the sky got darker, Fuego got more spectacular. We all sat there with our jaws to the floor, wowed every time Fuego erupted with sparks of lava. Looking back at the video footage I have on my phone, I hear everyone exclaim “WOWWWW!” in every single clip, which makes me laugh and smile about how excited we all were!
As the rest of the group started getting back from their evening adventures, we sat down for dinner. The guides made us a lentil curry + rice, which was simple but delicious and very filling! It filled our bellies and warmed us up.
After dinner, we spent more time hanging out around the fire, drinking hot chocolate, roasting marshmallows, and trying to catch more of Fuego’s explosions, but all decided to retire to our cabins before 10pm.


Spending the night at Base Camp
Between the cold, altitude, and Fuego’s loud noises, it was a pretty restless night. I probably got an hour or two of sleep, at most.
Even with the sturdy A-Frames protecting us from the wind, it was still pretty cold. I slept with all my clothes on – base layer, fleece, jacket, beanie, scarf, socks, and gloves. Wicho & Charlie’s provided us with a sleeping bag and a thick blanket. I was relatively warm when under the covers, but whatever wasn’t inside (like my face) was COLD.
Acatenango Overnight Hike Day 2

Summiting Volcan Acatenango
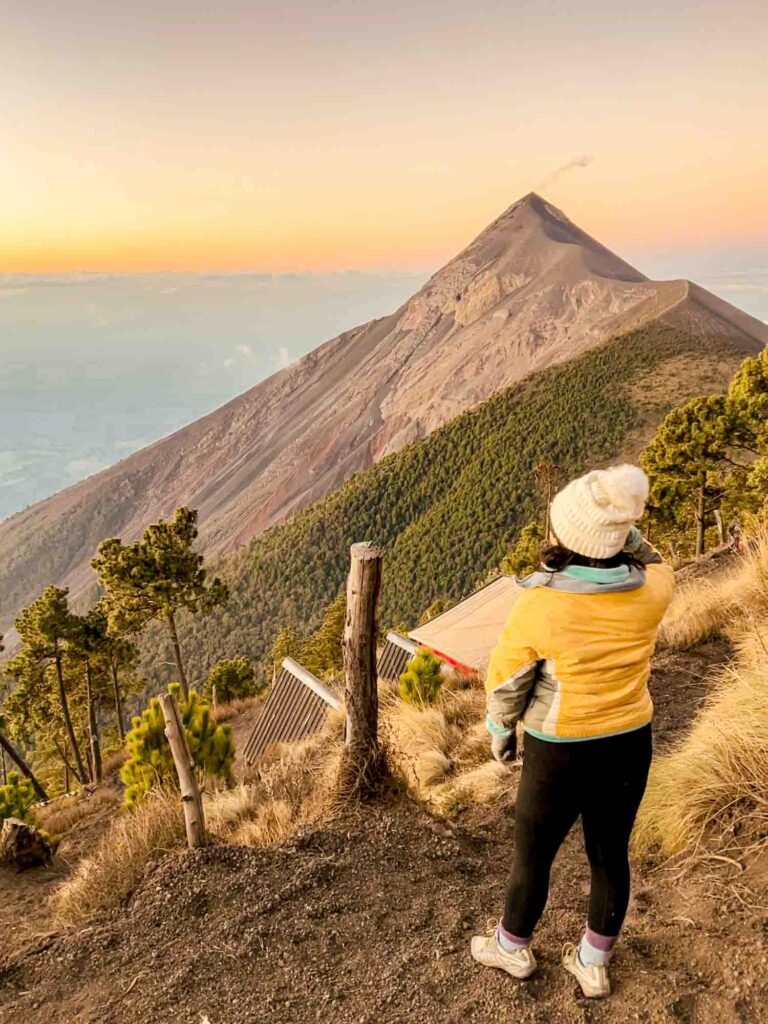
If you didn’t go on the sunset hike to the Acatenango summit, you can also go for sunrise. The wakeup call is super early – people started getting up around 4am, and the group left at 4:45 am.
You will be hiking in complete darkness – so be sure to wear a headlamp!
In the end, I decided not to summit and just relax at base camp. I did ask my friends Jess and Jimmy about their experience climbing to the summit (although they did it for sunset), and they said it was difficult – but the view was amazing!
It’s another 1000 feet or so ascent to get from base camp to the summit – this takes about 1-1.5 hours. You’ll encounter more of that slippery volcanic sand from the last part of the hike up to base camp, which makes it feel like you’re sliding back every time you take a step, which makes it feel especially difficult.
Do note that it’s super cold and windy up at the summit (our guides emphasized this multiple times before starting the hike) – bundle up, and be sure to take gloves, a beanie, and a scarf for added warmth!
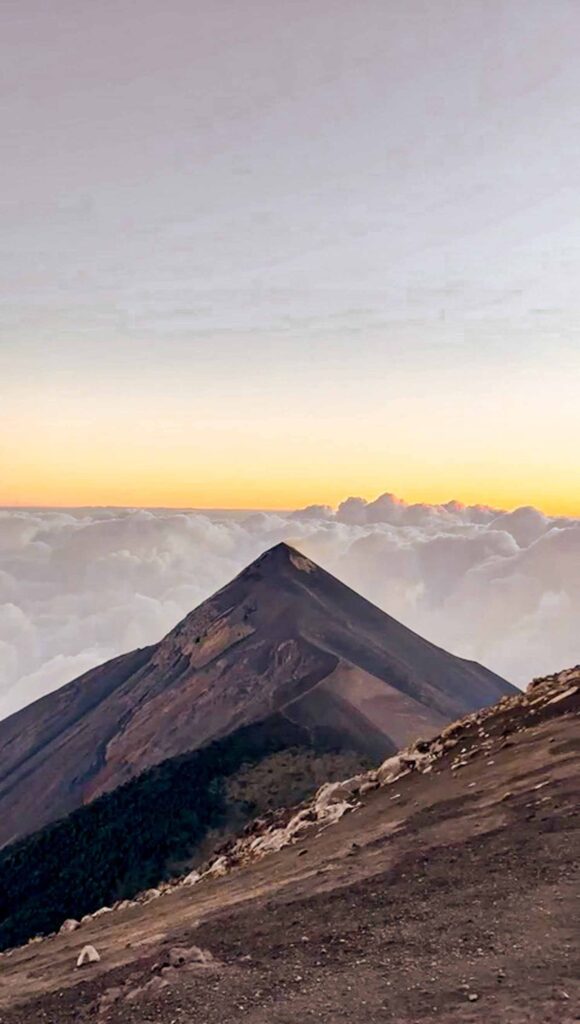
Jess and Jimmy said that the coolest thing about climbing up to the summit is that you’re basically standing on top of the clouds and that it makes it feel like you’re standing on top of the world!
(or watch the sunrise from Base Camp)
As I mentioned earlier, I opted not to make the final climb up to the summit, along with a group from our camp. We decided to just watch the sunrise from base camp and just relax before starting our descent.
We all hung out by the fire and enjoyed our coffee while savoring the view of Fuego and gazing at the sun come up over Volcan Agua. I really enjoyed this part of the experience, and having the chance to get to know the others in the group.
A friend of mine who did the Acatenango overnight hike a few months before me also didn’t summit and said that it didn’t take anything away from the experience, and I agree with her. It’s still a pretty incredible view from base camp, and I am completely satisfied with my decision!
Then we waited for everyone else to get back from the summit, had some breakfast, packed up our stuff, and then started our descent back to the trailhead.
Descending
The entire time hiking up to base camp, I was really looking forward to the descent because I thought it would be easy. Well, as it turns out – the descent was not so easy. I completely underestimated it.
Remember that volcanic sand? It’s as hard to descend in it as it is to climb up in it.
Even the rainforest part, which had relatively solid ground, was really hard to come back down because it was so steep. I fell at least five times. Many others in our group fell as well.
Be sure to wear shoes with solid grip and ankle support – I wore my lighter hiking shoes which didn’t have ankle support and I ended up spraining my ankle a bit.
Also, the trekking poles will help when coming back down the mountain!
After getting back to the trailhead, we waited for our shuttles, then drove back to the tour office. We’d arranged a shuttle through Wicho & Charlie’s to head onwards to Lake Atitlan, so once we got back, we had some lunch, and then headed on our way!
I SURVIVED!!!!
Tips for hiking the Acatenango Volcano
- Bring warm layers: As I’ve mentioned before, it gets COLD as you head upwards in elevation. It gets freezing at night, and the summit is super chilly and windy as well. Bring warm layers, and a beanie, scarf, and gloves – our guides emphasized this multiple times.
- Drink plenty of water! This is especially important to help with the altitude. They recommend at least 4 liters of water per person, with a liter going to the guides to help cook your food. The tour company provided us with free filtered water and water bottles, although I think having a hydration bladder would’ve made it easier so you don’t have to keep reaching for the bottles. Also consider drinking some electrolytes!
- Use trekking poles (or a walking stick): It will help you a ton in the slippery volcanic sand, and save your knees when descending. Either rent some for a nominal fee from the tour company, or buy a walking stick from the locals near the trailhead.
- Wear a good pair of hiking shoes: Some people will say that the Acatenango hike can be done in regular athletic shoes, but I beg to differ. Get hiking boots with good grip and ankle support.
- Don’t be afraid to go slow: It’s a steep, relentless climb! Don’t be afraid to go slow, even if it feels like the rest of the group is going way faster than you. Go at a comfortable pace – it’s a marathon, not a sprint. The guides won’t leave anyone behind.
- Prepare for altitude: Altitude affects everyone differently, but I definitely felt it. Some tips for adjusting to high altitudes – go slow, drink plenty of water, and take some meds if you need to.
- Consider hiring a porter: If you are especially feeling a bit anxious about the hike, consider hiring a porter. My friend who had previously done the hike convinced me to, and I was so thankful that I did! My porter stayed with me the entire time, even though I was one of the slowest in the group. It was also very affordable – the cost depends on the weight of your luggage, but mine ended up being around 300Q. It also gives these guys some work. I didn’t hire a porter on the way back down, but this is also an option – you just have to let them know the night before.
- It’s ok to not summit: Even if you don’t end up summiting, you’ll still get the thrilling experience of getting up close and personal to Fuego. Hanging out at base camp to watch the sunrise was one of my favorite moments during the Acatenango trek. If you feel wiped, don’t feel like you have to force yourself to keep going. Take some time to relax.
- Cut your toenails: My friend didn’t and ended up losing a toenail when hiking Acatenango.
Would you do the Acatenango hike? Let me know in the comments!
More Guatemala content you may enjoy:
The Complete 7 Days in Guatemala itinerary
Best Towns to Visit in Lake Atitlan
The Ultimate Antigua, Guatemala Travel Guide
Liked this post? Save this guide to the Acatenango Volcano hike on Pinterest for later!


Caroline is a Southern California based traveler, writer, and photographer. She travels all around California, the US, and the world in search of the most colorful places, the most delicious food, and bucket-list adventures. Her aim is to inspire other travelers discover how to add more adventure and joy to their lives. On Pictures & Words, you’ll find detailed guides + itineraries, along with vibrant photos to help you plan the the most epic trips. When she’s not traveling, Caroline also runs half marathons.